


With the rise of remote work, online learning, and different digital marketing trends, being able to capture your screen while also including audio is becoming more and more important as a means of communication and collaboration. So, screen recording is quite an essential tool for many individuals, whether it’s for work, education, or entertainment.

If you’re a Mojave or older version user, you may be wondering how to record a screen on a Mac with everything included, especially your system sounds and audio from a microphone. In this guide, we’ll walk you through several options to help you screen record on a Mac with audio without any hassle.
Also read: How to Backup Gmail to Hard drive on Mac System?
4 Ways to Record Your Mac Screen
Before we dive in, please note that some methods may require a higher macOS version, so make sure to check your system’s compatibility and update if necessary. For each of the methods listed below, we’ll provide step-by-step instructions from enabling the necessary settings to capturing your screen. Now, let’s take a look at how to screen record on a Mac in four different ways.
1. Screenshot Toolbar
One of the easiest ways how to screen record on a Mac is through the built-in tool. For the most part, as the name suggests, the Screenshot Toolbar allows you to take screenshots. But, did you know that it also has a screen recording feature with audio as well?
Steps to Record Screen with Screenshot Toolbar
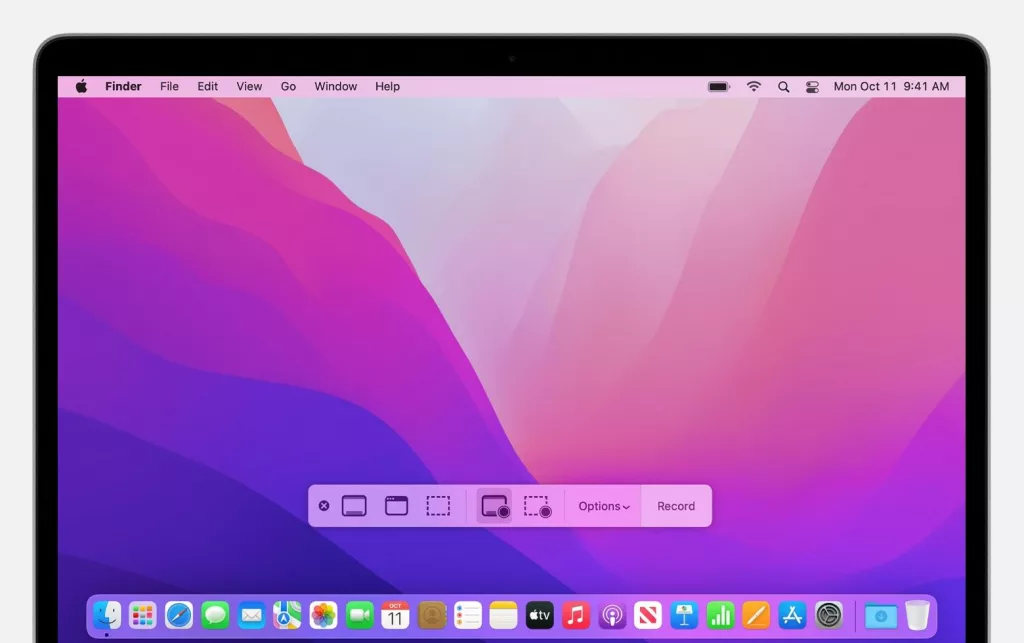
- To access the Screenshot toolbar, press and hold the Shift + Command + 5 keys. This will bring up the toolbar at the bottom of your screen, where you can select the option Record Entire Screen or Record Selected Portion.
- Before starting the recording, make sure to click on the Options button and check the Microphone box under Audio. Furthermore, declutter your desktop and close any unnecessary windows before recording. This will ensure a smooth and clean recording without any distractions.
- Once you’ve made all the necessary preparations, click on the Record button or press the Control + Command + R keys to start recording. You will have a three-second countdown before it begins, so make sure to get ready during this time.
- Once you’re finished recording, simply press the Stop button in the menu bar or use the keyboard shortcut again.
Pros/Cons of Screenshot Toolbar
Screenshot Toolbar is one of the best screen recorders for quick and easy video capture. You don’t have to pay for anything, and the tool comes pre-installed on any new macOS device.
However, it does have its limitations. The audio quality may not be as good as other methods since it’s recording through your Mac’s built-in microphone. Additionally, you can’t edit the recording before saving it, so any mistakes will have to be re-recorded.
Also read: Top Productivity Tips Mac Beginners Can Rely On
2. QuickTime Player
Another option for screen recording a Mac with audio is using QuickTime Player. Yeah, we all know that this application is about playing media files, but it does have a screen recording feature as well, hidden in plain sight.
So, how to record a screen on a Mac with QuickTime Player?
- Open the app through Finder or by searching for it in Spotlight.
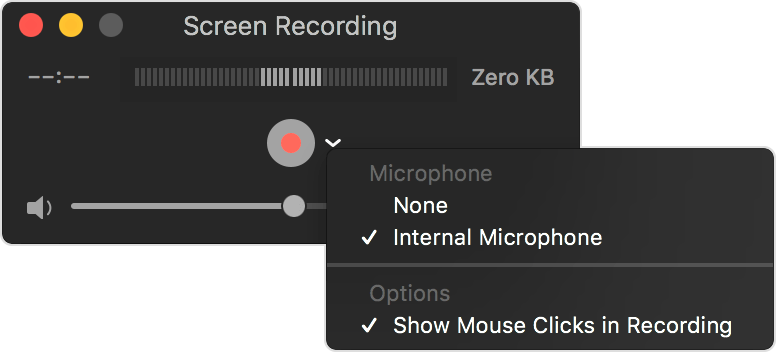
- Go to File > New Screen Recording. This will bring up a small screen recording window where you can click on the down arrow next to the record button and select Internal Microphone or any other external microphone you have connected.
- Hit on the Record button and select the area of the screen you want to record.
- When you’re finished recording, click on the Stop button in the menu bar.
Pros/Cons of QuickTime Player
QuickTime Player is also pre-installed on your Mac and is 100% free to use. You also have the option to trim your recorded video before saving it, which is a big plus.
The main downside of using QuickTime Player is that it doesn’t allow you to record system audio, so you won’t be able to capture any sound from your computer. It also doesn’t offer any advanced options such as annotations or screen effects.
3. Movavi Screen Recorder
If built-in options aren’t enough for your needs, you can also screen record on a Mac using third-party software. Considered one of the best Loom alternatives, this one is a popular choice among Mac users for its user-friendly interface and advanced features.
Steps to Record Screen on Mac with Movavi Screen Recorder
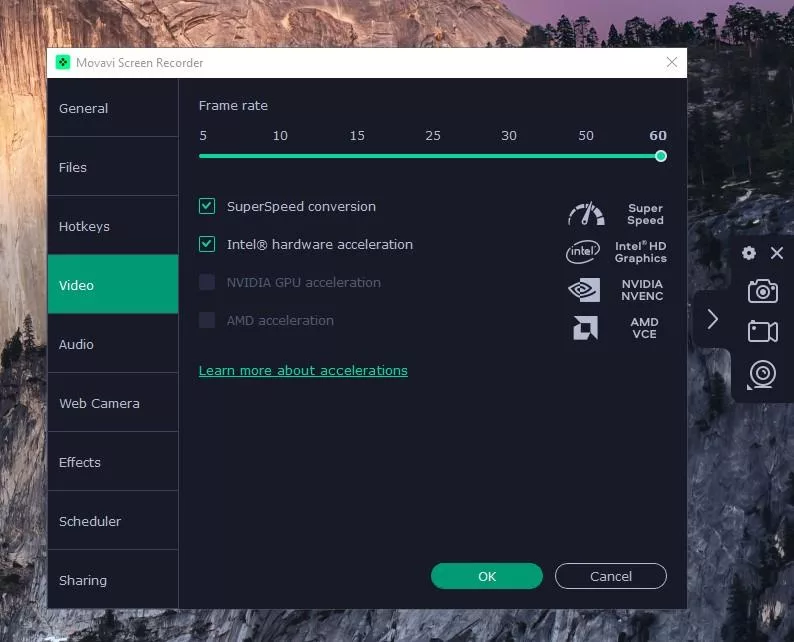
- To use Movavi Screen Recorder, download and install it from the official website on your Mac. Open the program and click the cogwheel to access the Settings menu. Choose the webcam option, adjust audio quality, pick a framerate, and decide if you want to show cursor or keyboard actions during the recording.
- When you’re ready, go to the Screen Recording option and select the area of the screen you want to capture. This can be a specific area you manually resize by dragging the mouse or typing in exact dimensions, or an entire app window. The software shows an orange border around the area you’re hovering over, so you can easily see what will be recorded.
- Start by pressing the REC button, hit the Stop button when you’re done, or use the previously set keyboard shortcuts. Trim the recording if necessary and choose one of many popular formats for the export.
Pros/Cons of Movavi Screen Recorder
Movavi Screen Recorder offers high-quality recordings with customizable settings and simple editing feature, making it a great option for both personal and professional use.
It also has advanced features to schedule recording sessions, draw on the screen for annotations, remove background noise, and share online to YouTube or Google Drive.
However, with all these features, it does come with a price tag and may not be suitable for those searching for a free option. But, there is a free trial available for those who want to test it out first.
Related: Quick Steps To Merge PDF Files Into One On Mac
4. Screenflick
The last on the list but not least, Screenflick is another reliable third-party software for screen recording on Mac. It offers both simple and advanced options for recording your screen with audio.
Steps to Record Screen on Mac with Screenflick Screen Recorder
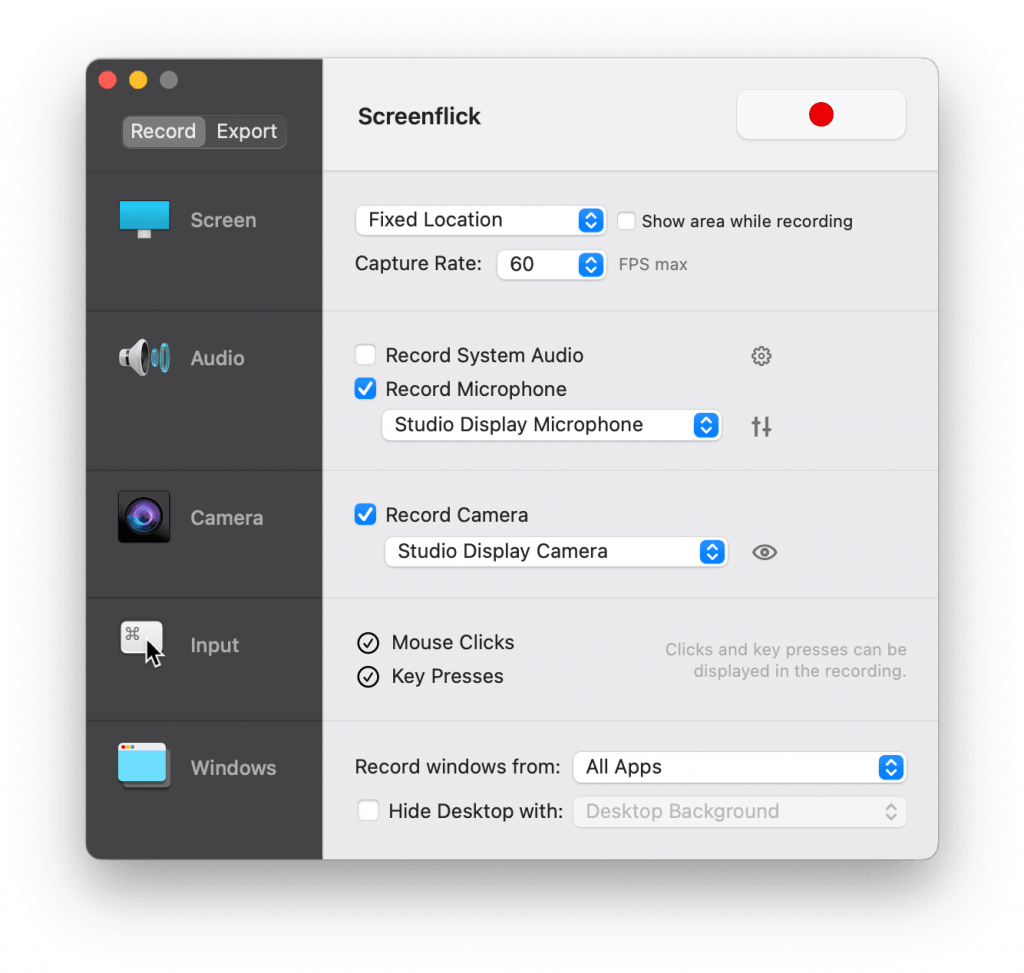
- After downloading and installing Screenflick on your Mac, open the app. Go to the Settings menu and customize everything from the recording position and audio quality to mouse clicks and keyboard strokes capture.
- Select the area of the screen you want to record, and press the Record button to start.
- Pause when necessary and click the Stop button once you’re finished. Tweak the appearance of the video on the preview window and save it in a popular format like MP4 or MOV.
Pros/Cons of Screenflick
Screenflick offers a variety of options for capturing your screen with audio, making it a versatile choice for any type of recording. You can customize hotkeys, add annotations during the session, and even create time-lapse videos.
The weak spot is it doesn’t have any editing features, so you’ll have to use another software for that. It also comes with a free version that limits your recordings to only 10 minutes. To have access to all features and unlimited recording time, you will need to purchase the full version.
Also read: These Top 10 Best AI Video Generators Will Blow Your Mind
Conclusion
So there you have it — four options on how to record a screen on a Mac with audio. Having in mind the pros and cons of each software, decide which one best suits your needs and start creating your own screen recordings in no time. Whether it’s for personal or professional use, screen recording on a Mac is now easier than ever. So go ahead and try it out!


Leave a Reply